Showing posts with label diy. Show all posts

Wednesday, October 7, 2015

BOO Hand Print Art

While we did a little pumpkin painting this weekend, I decided to go ahead and use the paint to create a cute Halloween art with the boys. I just painted their hands black and pressed them on white cardstock.


While the hands were drying I turned to picmonkey to print off a "scary" B. Here is mine (feel free to use it). 

I then used some white paint to make little ghost eyes and mouths (I am no artist). I cut out the cardstock hands and taped them down to the B page I had printed. I put into a $2 frame from Dollar General. 

You are probably thinking "shouldn't those ghosts be white?". Well yeah but sometimes you just gotta work with what you got around. Plus, I think they are still really cute and the boys kept saying "B. O. O. Boo!" while screaming out the Boo in a scary voice. They loved it. 


Thursday, October 1, 2015

Baby Shower Favorites

On Sunday I hosted a baby shower for my sister Samantha. She is due to have Maybree Lynn on November 2. Her best friend Wendy was also a hostess. Wendy is much like me and loves crafting. I am an awful blogger and didn't take many pictures. It is really hard to host and take pictures. I should have asked someone to take over photography duties. Since I don't have a lot of pictures of the actual shower I will share with you a few of my favorite decor items. Our theme was a girly woodland theme.

1// It's hard to see from the picture but the pumpkin was spray painted coral. Please don't pay attention to the stem. I meant to tie a burlap bow to the top and it ended up not happening as time became an issue. I use a gold paint pen for the M and the dots. I am no artist!

2// I created this print using Picmonkey. My now plan is to print this again but on burlap. It will be super cute in her nursery. 


3// I picked this chalkboard up from Target for $3. The woodland animals were from a $1 cardboard wreath I purchased from Family Dollar. 


4// I ordered this print from this Etsy shop. It was only $5 and it fit the theme perfectly. It is also going to be displayed in Maybree's nursery. 


5// I can't take credit for the spray painted pine cones (my co-hostess did them) but I loved the pop they brought. I had a super cute metal leaf tray for them to be displayed in. 


Wednesday, September 30, 2015

I Printed on Burlap!

Being the true Southern gal that I am, I love burlap. The idea of being able to print on it was something I really wanted to do. I ran across this tutorial and thought maybe I could do it.  

Here is how I did it:

1. Take a piece of printer paper and use it to cut a piece of burlap the same size. 
I laid it all out of the floor. I put the printer paper on top of the burlap and used a marker to trace how big to cut the burlap. I made the burlap just a little bigger than my printer paper.

2. Cut a piece of freezer paper to fit over the burlap.
It doesn't have to be an exact. It can be a little bigger than the burlap. 

3. Put freezer paper (wax side down) on top of burlap and iron on.
Make sure you get the edges really well. The picture below is after it had been ironed. Make sure your freezer paper is on top of the burlap when you iron.


4. Cut the freezer paper with attached burlap to fit the size of a regular sized piece of printer paper. 
I had to do some trimming to get it to be cut to size. 

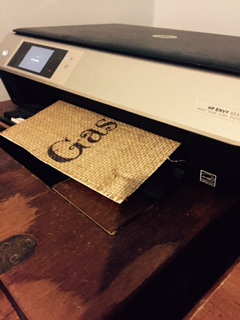
5. Put the freezer paper with attached burlap into your paper tray. Hit print.
You want it to print on the burlap and not the freezer paper so put it in your paper tray in such a way that the burlap gets printed on. It took me two tries to get it to work. The first time it said paper jam. I got out the burlap and trimmed it a little more and it worked the second time. 

6. Pull off freezer paper and use burlap how you wish. 
I'm making a gift for my secret pal. Hopefully the finish product will make it to Perks of Ponder. 


Thursday, September 24, 2015

Make Your Own Shirts

With money being tight I decided to make some cute shirts for Jack that I've seen around. I originally wanted to buy Jack this shirt.

pumpkin patch shirt perfect fall tractor by zoeysattic on Etsy, $16.50:

The shirt I made for Jack isn't nearly this cute but I'm completely new to this. I'm going to use the one I made is an undershirt and pair it with a cute over shirt or light jacket.


I also couldn't stop myself from making this shirt. 


What I used:
1. Printer
2. White shirts
3. Print and transfer paper
4. Picmonkey

It took messing around with Picmonkey and using regular paper until I got exactly what I wanted. I wish that our Walmart had more options because I wouldn't have went with white shirts but I'm still pretty happy with how they turned out. It was fun just getting to design and make something specific for Jack. I have one more shirt I plan on making with just a monkey and Jack's name. We all call him monkey so I thought it would be cute. I really recommend making a few shirts of your own just for fun. It is also much cheaper.

What kind of shirt would you make?